Store Locator App for Webflow
Add to Webflow in Minutes – No Coding, From Just $25/Month
Fully customized to match your branding, fonts, colors & much more...
Included free with all plans!
Thousands of small businesses, global brands, and everyone in between use Storepoint to power locator widgets on their websites. Browse examples →


What makes our store locator app unique?
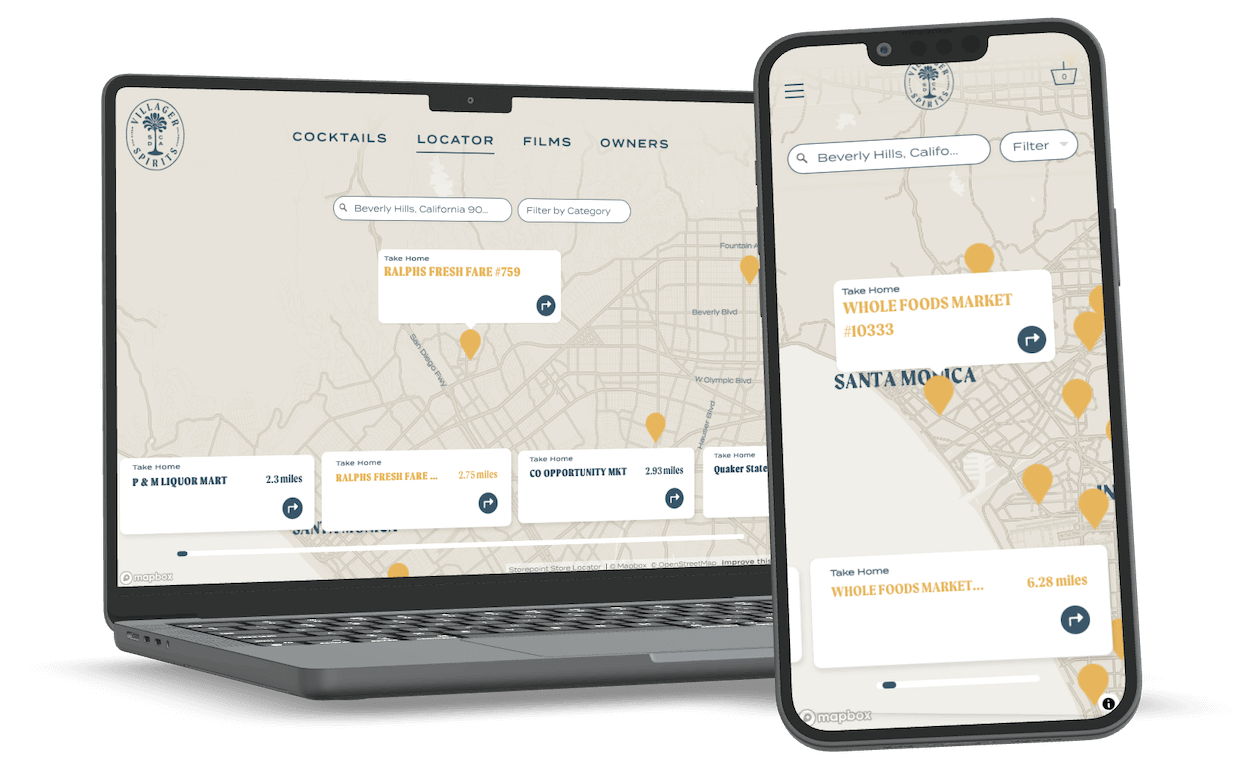
Your Webflow website is beautiful, clean, and easy to use - it only makes sense that your store locator should be too!
In addition to our essential customization options in the dashboard, we offer complimentary brand styling support. This ensures your store locator matches your Webflow site's look in colors, fonts, and more, creating a beautiful and cohesive appearance - all included in every plan with no coding required on your end.
Designers & Developers: You can also edit CSS for even finer control.
Have a specific mockup or design idea in mind? We offer tailored solutions to match your vision with custom plans. Contact us to discuss your project.
See store locator design examples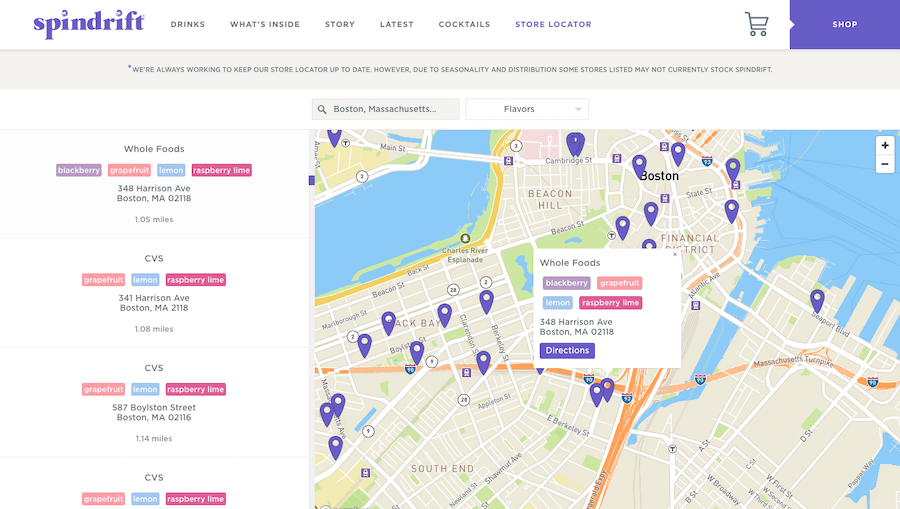
Loved by thousands of small businesses, global brands and everyone in between.


We've built a store locator app for Webflow that is...
A piece of cake to manage.
Easily Add & Edit Locations
Add, edit and upload locations easily in our purpose-built dashboard. You can also easily upload from a spreadsheet or sync directly from a Google Sheet!
Bulk CSV Import or Google Sheets
Import to your store locator from a spreadsheet of locations. Works right out of the box.
Sync from Google Sheets
Love Google Sheets? Setup an automatic sync of locations directly from Google Sheets to the Store Locator.
Webflow CMS Sync
Our Pro plan and above include Webflow CMS sync, making it easy to integrate your store locator with Webflow CMS. This allows automatic updates from your Webflow CMS database to your store locator.
Add To Your Website In Seconds
Add our store locator widget to your website with a simple copy-and-paste. Any updates after are all automatic! Works great on all website platforms.
Valuable Metrics & Analytics
Discover where customers are searching, popular locations and get ideas for new stores.
Anywhere & any Language
Works with locations all over the world. Serve multiple markets? Create translated versions of your store locator.
Top-Rated Support
We built Storepoint to help you create an amazing locator. We're here to make the process a piece of cake! We love to help so you'll never get a cookie-cutter response from us.
Delightful to use.
Search by Zip, City, Postcode...
Intuitive search function with autocomplete suggestions makes it easy for your customers to find the right nearby locations.
Automatically Detected Location
Users can instantly see their nearest locations based on their phone's location or detected location.
Product, Category & Tag Filtering
Tag locations with products, services, or categories and let users filter results. Great for dealer locators, stockist pages, and where-to-buy product finders.
Custom Fields & Buttons
Optionally add custom fields in addition to our standard fields. Add extra info or buttons to your locations.
Great on Mobile
Our locator is fully responsive so it is designed and optimized to work on any device: phones, computers, tablets...
Keyword Search
Optionally enable keyword search, allowing users to search locations by name.
Open Hours
Optionally display store/open hours on your locations.
Instant Directions
With the click of a button, users get directions from their current location to their selected location.
Beautifully designed.
Customize Everything
Set up your locator exactly the way you want it with simple yet powerful settings in the dashboard. For more detailed customization, you may edit your own CSS or use our brand styling support - included with all plans.
Free Brand Styling Service
Included free with all plans, our developers help beautifully customize your locator to match your brand. We'll make sure the locator looks great on your website. Of course, you can always edit your own CSS if you'd like.
Custom Map Markers
Choose a custom color for your map pins or upload a custom image to use for your map markers. You may also set up different icons for different types of locations.
Custom Map Themes
Color maps, dark maps, greyscale maps or create your own map theme using your brand colors.
Your Fonts
Use the exact fonts you use for your brand and website. Your store locator won't feel out of place.
Your Colors
Choose your link & button colors to match your brand style.
Got ideas? We'll work with you to build out custom features & functionality.
Create your locator in minutes.
1. Add, bulk upload or sync locations
2. Copy-paste into your website once and you're all done!
3. When you edit locations, all changes automatically update on your website.
Not ready yet? Explore our examples or contact us to chat about your project.
Frequently Asked Questions
Common questions about using our store locator on Webflow.
How do I add the store locator app to my Webflow site?
Simply copy-and-paste the embed snippet we provide once you've set up an account into your Webflow page editor (using an embed/code block in Webflow). Here's a tutorial on installing our store locator app on Webflow →
How will my locator be customized to match my Webflow theme or brand?
Once you've added your locator to your Webflow site, your fonts will automatically inherit and you can adjust a variety of customization options and settings within our dashboard. You may also work with our designers to beautifully match the widget to your Webflow theme and your company's branding, fonts, colors and much more...
Does Storepoint store locator sync with Webflow CMS?
Yes, our Pro plan and above include Webflow CMS sync, making it easy to integrate your store locator with Webflow CMS. This allows automatic updates from your Webflow CMS database to your store locator. For more details, visit Webflow CMS Integration →
Once the store locator is on my Webflow website, how can I make changes to stores/locations?
You can add/edit locations in our dashboard, import from a CSV spreadsheet, sync from Google Sheets or sync from your Webflow CMS. When any changes are made, the locations will automatically update on the store locator in your Webflow site.
Learn More
Explore relevant articles, tutorials, and features to get the most out of your store locator on Webflow.
Our customers love using Storepoint
I love Storepoint! It's the perfect solution for us with the flexibility to change and update locations quickly. The design is professional and clean and custom to our brand. It's affordable and their customer service is exceptional! Love the sync to Google Sheets too.
Katie W.
Web Designer
I am so thrilled to have found Storepoint because it makes my map beautiful and easy for me to update. Customers love the experience and so do I!... Adding new locations takes seconds and you can review updates super quick. I also love the ability to add tags and categories for each location. You can add custom map pins too.
Tom R.
Founder
From first click of purchase to final product was about 15 minutes of chatting with Jake. He created a beautifully customized map with basically no direction. I'm a stickler for design and the product is beautiful. Highly recommend.
Maggie
Article One Eyewear
Easy to use, highly customizable, very reactive and helpful team of people to work with.
Bridgette S.
Marketing Manager
"Happy new subscriber - Great platform, easy to use and excellent service!"
Anna O.
Co-Founder at Arctic Power Berries