Add a store locator to any WooCommerce page in a single paste. Your Storepoint locator updates straight from your dashboard whenever your locations change, so the storefront you built stays exactly as you built it.
Use it as a store locator, dealer locator, stockist page, where-to-buy product locator, retailer finder, or service-area page. Drops into a Custom HTML block in Gutenberg, or the equivalent code element in Elementor, Divi, WPBakery, Beaver Builder, Bricks, and Oxygen. Works on every WooCommerce theme.
Start your free trial See examples and features
Step 1: Set up your locator
- Create a Storepoint account and follow the prompts (you'll pick a map provider and a few basics), or log in if you already have one
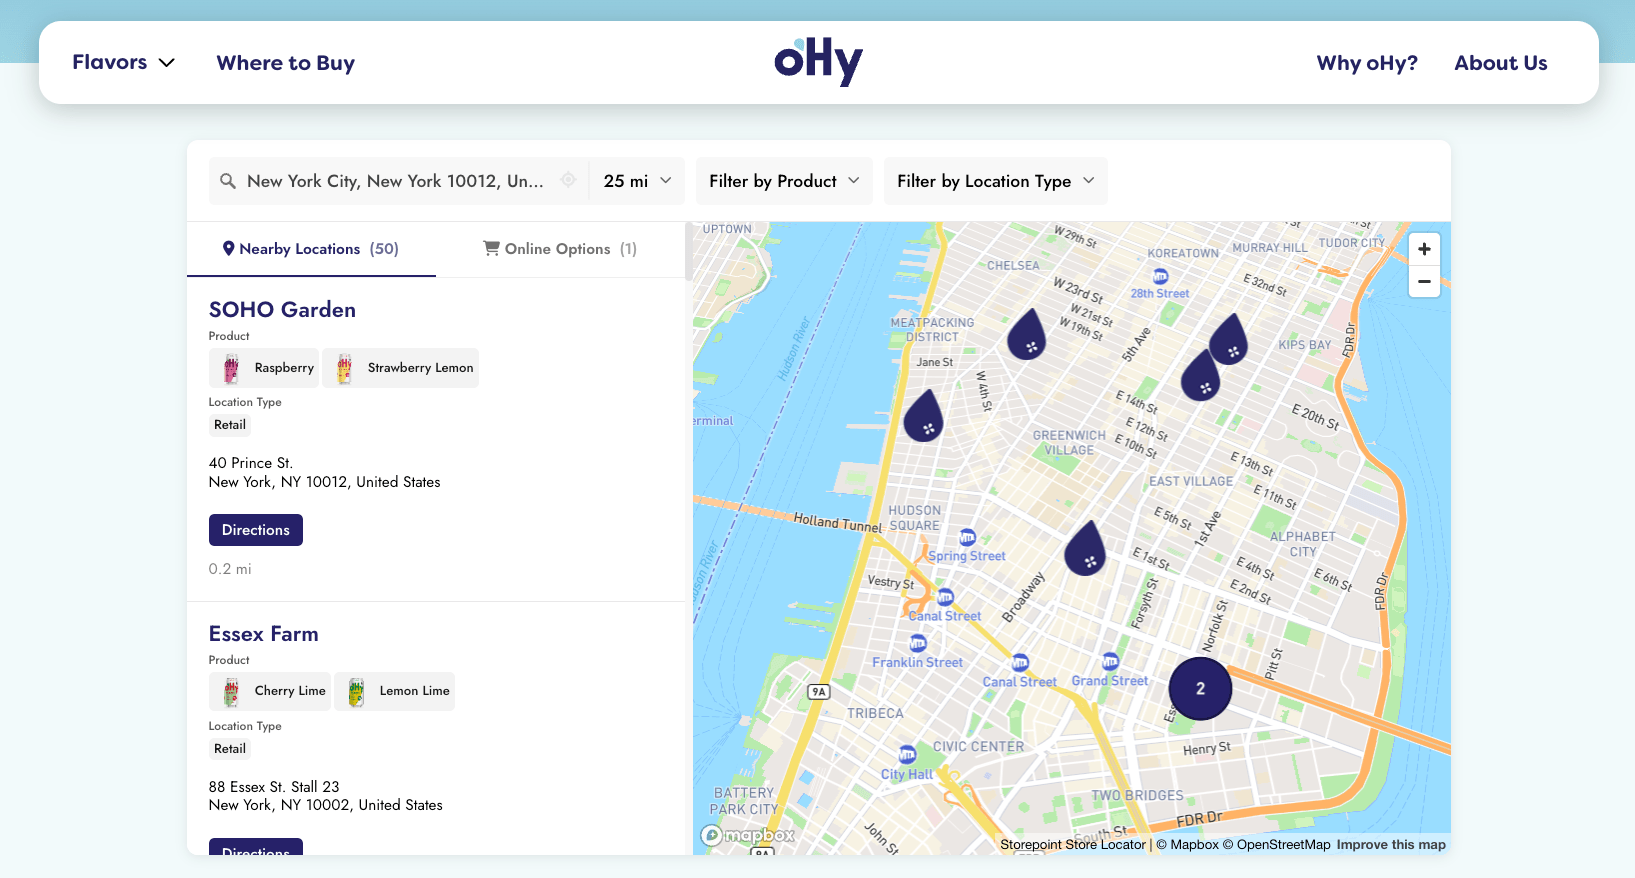
- Add your locations: type them in, import a spreadsheet, or sync from Google Sheets
- Open Embed in the dashboard sidebar and copy your snippet
Step 2: Paste it onto your page
In WordPress admin, go to Pages. Either edit your locator page (if you've built one) or click Add New and name it ("Store Locator", "Find a Store", "Where to Buy"). Then pick the path that matches your editor.
Gutenberg (the default editor)
- Click the + to add a block, search Custom HTML
- Paste your Storepoint snippet
- Click Publish or Update
On a new line in the editor, type /html and hit Enter. Custom HTML block, instantly.
Elementor
- Open the page with Edit with Elementor
- Drag in the HTML widget (in the General widgets section)
- Paste your Storepoint snippet into the HTML Code field
- Click Update
Divi
- Open the page in the Divi Builder
- Add a Code module to a row
- Paste your Storepoint snippet
- Click Save
WPBakery
- Add a Raw HTML element to your row
- Paste your Storepoint snippet
- Click Save Changes
Beaver Builder, Bricks, Oxygen, anything else
Look for an HTML block, Code Block, or Raw HTML element in your builder. Paste the snippet, save.
Classic Editor
- Click the Text tab in the top right (not Visual)
- Paste your Storepoint snippet
- Click Publish or Update
If you switch to Visual after pasting, the editor will rewrite or strip the snippet. Paste in Text mode and save without flipping back.
Step 3: View your live page
Open the page on your site. Search for a location. Confirm the map and list both load.
If you use WP Rocket, W3 Total Cache, LiteSpeed Cache, or your host's cache, purge once after pasting. Some caches hold an old version of the page until you do.
That's the full setup. From here, every location update flows through your Storepoint dashboard. Your WooCommerce store stays exactly as you built it.
Add it to your menu
To help shoppers find the page:
- Go to Appearance > Menus
- In the Pages box, tick your locator page and click Add to Menu
- Drag it to where you want it in the menu order
- Click Save Menu
If you use a mega-menu plugin, add it the way you'd add any other page.
Make it full width
Most WordPress themes hold pages to a content column with a sidebar. To let the locator stretch:
- Look for a Full Width or No Sidebar template under Page Attributes in the page sidebar
- In Elementor, mark the section as Stretch Section in the section's Layout settings
- In Divi, set the row width to 100% and section padding to 0
- In WooCommerce-aware themes (Storefront, Astra, Kadence), there's usually a "Full Width Page" template ready to go
Match your theme
Style it yourself from the dashboard: map style, marker pins, colors, button shapes, layout, custom CSS. Full CSS access is open on every plan.
Send us your WooCommerce store link and we'll match your locator to your theme. Fonts, colors, header height, button radius. Included on every plan. See examples →
Have a question?
Email [email protected] with your page link. We read every message and reply ourselves.
Where to go next
- Build a where-to-buy page with product filters and purchase links
- Filters and tags for product, brand, or service narrowing
- Map styles and custom pins from the dashboard
- Embed options for filtered or multilingual locators
- Real WooCommerce locators for inspiration